Actions and Docker Hub
This tutorial will guide you through creating a CI/CD pipeline for a Java project using GitHub Actions, Docker Hub, and Docker. You will learn how to automate the building, testing, and deployment of your application in a containerized environment and later we will run it on a Digital Ocean server.
Before starting, ensure that you have the following:
- A GitHub repository for your Java project.
- A Docker Hub account.
- Git and Docker installed on your machine for local testing.
- A server on Digital Ocean with Docker installed.
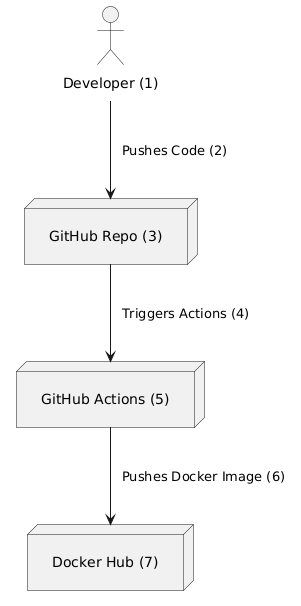
We will mainly be concerned about step 5 in the illustration: What happens when we push our code to the main branch and Github Actions kicks in. The following steps will be executed:
A. Building the Project: GitHub Actions will pull the code from the repository and build it using Maven.
B. Running Tests: All tests will be executed to ensure code quality and functionality.
C. Creating a Docker Image: Once the build and tests pass, a Docker image will be created using a Dockerfile.
D. Pushing the Image to Docker Hub: The created image will be tagged and pushed to Docker Hub for deployment.
E. Running the Image on Digital Ocean: The image will be pulled and run on a Digital Ocean server using docker-compose.
Check this overview of the full pipeline to understand the complete process.
But first, we need to setup the project for CI/CD so GitHub Actions can build and deploy our application:
- GitHub Actions Workflow File:
Create a file named
workflow.ymlinside the.github/workflowsfolder in the root of your project.
name: GITHUB ACTIONS WORKFLOW
on:
  push:
    branches: [ main, hibernate ]
  pull_request:
    branches: [ main ]
jobs:
  build:
    runs-on: ubuntu-latest
    steps:
      -
        name: Checkout
        uses: actions/checkout@v3
      -
        name: Set up JDK 17
        uses: actions/setup-java@v3
        with:
          java-version: '17'
          distribution: 'temurin'
      -
        name: Build with Maven
        run: mvn --batch-mode --update-snapshots package
      -
        name: Login to Docker Hub
        uses: docker/login-action@v2
        with:
          username: ${{ secrets.DOCKERHUB_USERNAME }}
          password: ${{ secrets.DOCKERHUB_TOKEN }}
      -
        name: Set up Docker Buildx
        uses: docker/setup-buildx-action@v2
      -
        name: Build and push
        uses: docker/build-push-action@v4
        with:
          context: .
          file: ./Dockerfile
          push: true
          tags: ${{ secrets.DOCKERHUB_USERNAME }}/hotel_api:latest
- Dockerfile:
Create a
Dockerfilein the root of your project to define how your application should be built and run inside a Docker container.
# Start with Amazon Corretto 17 Alpine base image
FROM amazoncorretto:17-alpine

# Install curl on Alpine
RUN apk update && apk add --no-cache curl

# Copy the jar file into the image
COPY target/app.jar /app.jar

# Expose the port your app runs on
EXPOSE 7070

# Command to run your app
CMD ["java", "-jar", "/app.jar"]
Maven Configuration: Make sure you have the
maven-shade-pluginin yourpom.xmlto package your application into a single JAR file:<build> <finalName>app</finalName> <plugins> <!-- Maven Shade Plugin for creating a fat JAR --> <plugin> <groupId>org.apache.maven.plugins</groupId> <artifactId>maven-shade-plugin</artifactId> <version>3.5.1</version> <configuration> <outputFile>${project.build.directory}/app.jar</outputFile> <!-- Directly specifies app.jar as the output file --> <transformers> <transformer implementation="org.apache.maven.plugins.shade.resource.ManifestResourceTransformer"> <mainClass>${project.groupId}.Main</mainClass> </transformer> </transformers> <filters> <filter> <artifact>*:*</artifact> <excludes> <exclude>module-info.class</exclude> <exclude>META-INF/*.SF</exclude> <exclude>META-INF/*.DSA</exclude> <exclude>META-INF/*.RSA</exclude> </excludes> </filter> </filters> </configuration> <executions> <execution> <phase>package</phase> <goals> <goal>shade</goal> </goals> </execution> </executions> </plugin> <!-- Maven Surefire Plugin for running tests --> <plugin> <groupId>org.apache.maven.plugins</groupId> <artifactId>maven-surefire-plugin</artifactId> <version>3.0.0</version> </plugin> </plugins> </build>
Did you remember to change the mainClass to the name of your main class?
<mainClass>${project.groupId}.Main</mainClass>
This is the class that contains the main method. Probably the class that starts your Javalin application like dat.Main. The package name is also important, but it is
inserted automatically på the ${project.groupId}
Setting Up GitHub Secrets: To authenticate with Docker Hub, first, add two secrets to your GitHub repository:
DOCKERHUB_USERNAME: Your Docker Hub username.DOCKERHUB_TOKEN: Your Docker Hub access token.
Navigate to Settings → Secrets and variables → Actions in your GitHub repository and add these two Repository secrets.
If you are using a
config.propertiesfile for storing credentials and keys in your java project, then make sure to also add them as secrets in your GitHub repository. For example:SECRET_KEY: 4c9f92b04b1e85fa56e7b7b0a34f2de4f5b08cd9bb4dfe8ac4d73b4f7f6ef37bISSUER: Dit navnTOKEN_EXPIRE_TIME: 1800000DB_NAME: navnet på din database
Update your HibernateConfig file to use environment variables to determine which configuration to load. Depending on the version of HibernateConfig you are accustomed to, you may need to refactor it to use environment variables. Maybe it’s already using environment variables, in which case you can skip this step.
Otherwise, this setup will help switch between test, development, and production configurations.
HibernateConfig.java
public class HibernateConfig {

    public static EntityManagerFactory getEntityManagerFactory() {
        if(System.getenv("PRODUCTION") != null) {
            return setupHibernateConfigurationForProduction();
        }
        return IS_TEST ? getEntityManagerFactoryConfigTest() : getEntityManagerFactoryConfigDevelopment();
    }

    private static EntityManagerFactory setupHibernateConfigurationForProduction() {
        Properties props = new Properties();
        props.put("hibernate.connection.url", System.getenv("JDBC_DATABASE_URL"));
        props.put("hibernate.connection.username", System.getenv("JDBC_DATABASE_USERNAME"));
        props.put("hibernate.connection.password", System.getenv("JDBC_DATABASE_PASSWORD"));
        return new Configuration().addProperties(props).buildSessionFactory();
    }

    // Other configuration methods for development and test environments
}
Make sure to set the following environment variables on your Digital Ocean server:
PRODUCTIONJDBC_DATABASE_URLJDBC_DATABASE_USERNAMEJDBC_DATABASE_PASSWORD
Many of us have used a version containing something like this:
private static Properties setDeployedProperties(Properties props) {
        String DBName = System.getenv("DB_NAME");
        props.setProperty("hibernate.connection.url", System.getenv("CONNECTION_STR") + DBName);
        props.setProperty("hibernate.connection.username", System.getenv("DB_USERNAME"));
        props.setProperty("hibernate.connection.password", System.getenv("DB_PASSWORD"));
        return props;
    }
In that case, we are going to use these environment variables later in the deployment process:
Make sure to set the following environment variables on your Digital Ocean server:
DEPLOYEDDB_NAMECONNECTION_STRDB_USERNAMEDB_PASSWORD
We will get back to this in a later tutorial when setting up The Hotel API.
Now that you have set up the CI/CD pipeline for your Java project, you can proceed to the next part of the tutorial: Setting up Postgres.
Happy Coding!